Wednesday, August 29, 2018
Joanne's Easy Bake: Easy Barbecue Sauce
Joanne's Easy Bake: Easy Barbecue Sauce: Summer days will still be around for a while with many days left to use the grill for chicken wings. I used to buy Bull's-Eye BBQ...
Easy Barbecue Sauce


Summer days will still be around for a while with many days left to use the grill for chicken wings. I used to buy Bull's-Eye BBQ sauce to marinade the wings. Recently I found it easier to make my own since I have all the ingredients in my pantry and fridge. The best thing about making your own is that you may make only as much as you need and you don't need to have all the left over sitting in the bottle forever.
Try this and you will know how good it tastes! If you want a spicy version, feel free to add some cayenne pepper powder to zest up the heat. I also used this sauce in my pulled pork filling for sandwiches.
Utensils
Measuring cups and spoons
A small heavy bottom gravy pot
Wooden spoon
Ingredients
Tomato ketchup (your own favourite brand)
2 tablespoons cooking molasses
2 tablespoons sherry or any sweet wine
2 teaspoons onion powder (NOT onion salt)
A dash of cayenne pepper powder (optional)
Method
Measure and place all ingredients in the gravy pot. Stir with wooden spoon to combine thoroughly. Place pot on the burner and turn heat on to medium. Stir occasionally to prevent burning and bring the sauce slowly to a boil. When it starts to bubble, remove from the stove and cool before using.
Enjoy!
*Enough for 1 pound chicken wings.
Thursday, August 9, 2018
Joanne's Easy Bake: Easy Peasy Rice Paper Rolls
Joanne's Easy Bake: Easy Peasy Rice Paper Rolls: If one is looking for gadgets to make Asian foods, Chinese supermarkets in Toronto are definitely one of thos...
Easy Peasy Rice Paper Rolls


If one is looking for gadgets to make Asian foods, Chinese supermarkets in Toronto are definitely one of those amazing places to go to for anything Asian; sometimes even better than in Asia itself! I was in the section where everything Vietnamese was stocked, when I found these colander like plastic plates which come in a pack of 12. They are made specially for rolling rice paper rolls and I was curious to see if they will really work. Since they are of reasonable price, I thought I will just buy and give them a try. My past experience with rice paper was truly frustrating. Once they are soaked in water, they tend to stick together easily regardless what surface one is working on! In the end, I made these rice paper rolls once and never make them again until recently with the help of these plates. My verdict - these plastic plates are a good buy if you are one who love making your own rice paper rolls at home! To make the process more effortless, I used cooked cold cuts instead of boiling a raw chunk of pork belly and slicing it on my own. In this recipe, I used packaged cold cut turkey and they are really lean and tasty! You may vary all the ingredients to suit your taste.
Utensils Needed:-
Colander like plastic plates (12 units) (if you can get them)
Or any suitable clean working surface (kitchen counter or plastic cutting boards)
A deep heat proof round plate (large enough) to drag the rice papers
Small stainless steel pot
Serving plates and bowls to hold your various ingredients
Ingredients for the rolls:-
18 cooked and chilled large shrimps without shells and tails (you may buy and thaw frozen cooked shrimps)
Cooked cold cuts (I used cold cut turkey) you may use chicken or ham or roast beef (your choice)
(Cut out 24 pieces into a rectangular size of approximately 1" x 2")
36 pieces of mint leaves
36 pieces of cilantro/parsley (only the tender leafy parts, discard the hard stems)
12 stalks of fresh garlic chives (cut into 3" length) (use only the green part)
12 pieces of head lettuce (or any lettuce of your choice) (you want only the leafy part)
1 whole carrot shreded
3 cups of cooked rice vermicelli (cooked, drained & cooled)
24 pieces of English cucumber (in strips of approximately 1/4" x 2")
12 sheets of rice paper
3 cups water
Extra water for boiling rice vermicelli
Method:-
Rinse the shrimps and set aside.
Fill the pot with about 1-1/2 cups of water and bring to boil.
Place shrimps in boiling water and cook over high heat until shrimps just turn pink.
Remove from heat and drain shrimps. Run cold tap water over shrimps.
Drain, shell and devein shrimps. Slice each shrimp into half by running your knife horizontally along the back of the shrimp. Arrange shrimps in a plate and set aside for use.
Using the same pot, fill it half full with water and bring to a boil. Place the dried rice vermicelli into the boiling water, let it soften and becomes opaque. Remove from heat and drain. Set aside in a plate to cool.
Rinse all the vegetables and herbs (lettuce, cilantro/parsley, mint and garlic chives) separately, drain and spin dry. Tear out the leafy parts of the lettuce and discard the hard center stalk.
Cut or tear the different herbs into sizes and set aside for use.
Scrape off carrot skin, wash, dry and julienne or cut into strips like matchsticks. Set aside.
Rinse cucumber and cut into strips of 1/4" x 2". Keep skin on.
Cut cold cut meats into size and set aside for use.
To make the hot water bath for the rice paper, pour 1-1/2 cups of filtered drinking water into the deep heat proof round plate. Place in microwave oven on high for 1 minute or until water is just slightly steaming but not boiling. Remove from microwave and set plate of hot water bath onto a flat steady work surface.
Drag each piece of rice paper briefly in the plate of hot water bath and place individually onto plastic plates. You don't need to shake off the excess water since the plastic plates will drain away any excess water as you work on the rolls. Repeat for all 12 sheets and stack the plates with the rice paper one on top of the other.
Then you may start rolling the rice paper rolls starting with the sheet on the first plate.
Begin by lining the rice paper with 2 pieces of lettuce about 1/3 from the edge of the rice paper closest to you, then start stacking two pieces of cucumber strips horizontally on top of the lettuce, about 2 tablespoons of julienne carrots on top of the cucumbers, about 3 tablespoons of rice vermicelli on top of the carrots, arrange 3 pieces of mint leaves one after another and 3 pieces of cilantro/parsley one after another horizontally on top of the vermicelli.
Then place 2 pieces of cold cut by arranging them horizontally beyond and above the vermicelli and 3 pieces of halved shrimp by arranging them horizontally one after another beyond and above the cold cut.
Fold the rice paper by lifting the bottom end over the vermicelli, then fold both ends on your left and right towards the center like an open ended envelope; then lift the roll slightly from the bottom using both thumbs and roll all the way to the top of the sheet making sure that the ingredients are not falling out on either the left and right ends.
Just before you reach the top of the sheet, place a piece of the garlic chive horizontally on the sheet leaving about 1 inch of the chive to stick out from one end.
Then complete the roll by rolling over the chive all the way to the end of the sheet. The rice sheet will seal itself. Just pat on it lightly to ensure that the seal is tight. Remove from plastic plate.
Place roll on a serving plate and cover with plastic food wrap to prevent drying out as you continue to finish all the 12 sheets. Repeat the process until you are done with the sheet on every plastic plate.
Ingredients for the dipping sauce:-
2 tablespoons Chinese barbeque sauce
2 pips garlic (finely minced)
1 teaspoon sesame oil
1 tablespoon pure peanut butter
3 teaspoons filtered water.
Method for dipping sauce:-
Place all ingredients in a small gravy pot and cook over low heat, stirring until it boils. Remove and pour into a serving bowl to use as dipping sauce for the rice paper rolls.
Enjoy!
Note: I find it a little tedious preparing the ingredients, but the rolling part is super easy and swift with the use of these special plastic plates. I will want to make these rolls again. After all, nothing is better than being able to vary the ingredients in the rolls when you are able to make them yourself!
Monday, June 25, 2018
Joanne's Easy Bake: Easy Cantonese Soy Sauce 'Chow Mein' (Noodles)
Joanne's Easy Bake: Easy Cantonese Soy Sauce 'Chow Mein' (Noodles): Soy sauce chow mein is one of the most common staple noodles served in Chinese restaurants during b...
Easy Cantonese Soy Sauce 'Chow Mein' (Noodles)


Soy sauce chow mein is one of the most common staple noodles served in Chinese restaurants during breakfast and lunch dim sum in Toronto. We are pretty lucky nowadays to be able to buy packages of steam noodles from main stream supermarkets. During my school days here, one could hardly find such conveniences. This style of fried noodles are popularly served together with rice porridge as a breakfast set in traditional style noodle shops on the streets of Hong Kong. Matthew, my little one, loves this noodles and I am adding to this blog for his sake. One day when he moves out and needs to cook for himself, he will be able to make them the same way as his mother did. No one will say 'no' to this tasty, easy and economical Chinese staple!
Utensils Needed:
4 - 5 quart stock pot
A non-stick deep frying pan
A small mixing bowl
2 pairs of bamboo or wooden chopsticks
A colander for draining the noodles
A wooden spatula
Measuring spoons
A stainless steel grater
Ingredients:-
1. 1 pound or 454 gm Cantonese style thin steamed noodles
2. 2 tablespoons light soy sauce (I used Amoy organic first extract reduced salt light soy sauce)
3. 3 tablespoons dark soy sauce (I used Amoy first extract dark soy sauce)
4. 1 tablespoon fish sauce (I used the 3 Crabs brand from Hong Kong) (you may vary this if you prefer the noodles to taste less salty)
5. 1 tablespoon sesame oil
6. 1 teaspoon granulated sugar
7. 1 tablespoon toasted white sesame seeds + 1 teaspoon for garnishing
8. 3 tablespoons of grated fresh ginger root with skin on
9. 5 tablespoons of cooking oil (your regular cooking oil) (I used peanut oil)
10. 1 litre of cold water
Method:-
Fill the stock pot with 1 litre of cold water and bring to boil on high heat. Once the water starts to boil, place the noodles into the pot, reduce the heat to medium and let it simmer for 2 minutes. Remove and drain noodles in a colander. Set it aside for use later.
Wash ginger root thoroughly and grate with skin on using a stainless steel grater. Grate on the side with the medium holes. Set aside.
Measure and place the light soy sauce, dark soy sauce, fish sauce, sesame oil and sugar in a mixing bowl. Give the mixture a stir with a pair of chopsticks and set aside.
Place two tablespoons of cooking oil into the frying pan on the stove and turn the heat on medium high. Add the grated ginger to the heated oil. Let it fry in the oil for 2-3 minutes until it is slightly brown. Add in the drained noodles. Turn the heat down to low. Loosen the noodles with both hands by using two pairs of chopsticks - holding one pair in each hand. Add the remaining 3 tablespoons of cooking oil into the noodles and toss to further loosen the noodles.
Then add the soy sauce mixture and toasted sesame seeds to the noodles. Toss the noodles again until all the noodles are coated evenly with soy sauce. Turn off heat and remove noodles onto serving plate. Garnish with extra sesame seeds before serving. Enjoy with your favorite rice porridge!
*Please note: It is imperative that you have to learn how to hold the chopsticks and with both hands too! You may use a spatula to toss and loosen the noodles, but the noodles will break into small pieces or be mashed by the time you get them into an even color! So please learn your chopsticks skills!*
Wednesday, May 30, 2018
Joanne's Easy Bake: Breakfast Egg Cups
Joanne's Easy Bake: Breakfast Egg Cups: Breakfast Egg Cups These breakfast cups are sure to impress and are easy to assemble once you get the hang of i...
Breakfast Egg Cups


Breakfast Egg Cups
These breakfast cups are sure to impress and are easy to assemble once you get the hang of it! It's all about layering with the ingredients. My recipe is adapted from joyofbaking.com. Since I am always tight for time, I modified the ingredients, using cooked ham and parmesan petals, to save preparation time. They can be prepared ahead on the night before, covered and stored in the fridge so that I can catch a bit more sleep the next morning. Made these first time on Mothers' Day for Erik's mom. She loved them and went out to get her own jumbo muffin pan after that!
Utensils
6-cup jumbo muffin tray (preferable)
Pastry brush
Small microwave safe bowl
Rolling pin
Wooden cutting board
Bread knife and chef knife
Ingredients
9 pieces white sandwich bread
6 fresh large eggs
3 large rectangular pieces of cooked ham or any cured cold cuts of your choice
2 tablespoons of finely chopped red bell pepper
3 tablespoons of chopped fresh chives
1/3 cups of crumbled parmesan petals or any other shredded cheese of your choice
1 tablespoon unsalted/salted butter (melted)
Salt and black pepper to taste
Method
Pre-heat your oven to 350 degrees F.
Place butter in a small microwave safe bowl and heat until just melted. Using the pastry brush, brush butter onto the inside of muffin tray and cover the base and sides of the cups completely. Set aside for use until bread and ham are ready.
Trim off all the 4 sides of the bread.
Place each piece of bread on the cutting board and flatten it with a rolling pin. Then cut 6 pieces diagonally into 12 large triangles. Cut the remaining 3 pieces into smaller triangles making 12 small triangles in all.
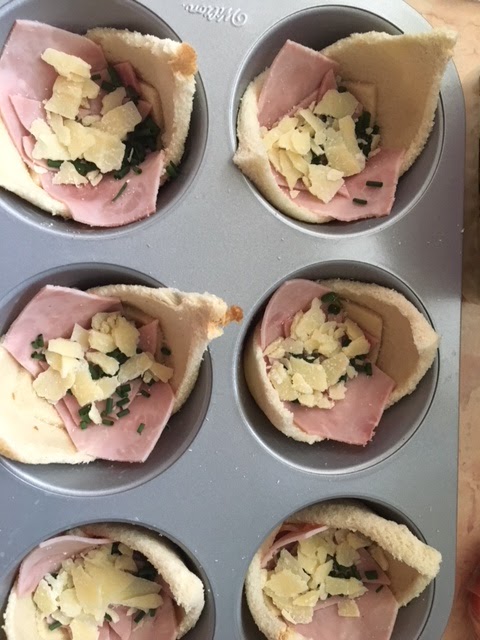
Place 2 large triangles of bread into each cup with the base of the triangle towards the bottom. Arrange each piece against the sides of the cup with each piece facing opposite one another. Press the four touching tips of the triangles together. Then to cover the bottom of the cup completely, form a square piece of bread by placing the bases of two smaller pieces of triangles facing each other and pressing them to the bottom of the cup and along the sides, making sure that the whole cup is completely covered with bread.
Cut the cooked ham or any cured cold cuts of your choice longitudinally into half. Trim both ends into triangular shape. *Do make sure the trimmed pieces are long enough to drape the bottom and up the sides of the cup. Keep the end pieces; line each cup with one piece of the cut ham. Use up the end pieces to line the bottom of the cup after you have lined the cup with ham.
Divide and sprinkle chopped chives into each cup on top of the ham.
Divide, crumble and place the parmesan or shredded cheese of your choice into each cup.
Crack one egg into each cup after you have placed the chives and parmesan.
Divide and decorate each cup with finely chopped red bell pepper.
Lightly sprinkle the top with salt and black pepper.
Place the muffin tray into the pre-heated oven for 10 minutes at 350 degrees F.
Reduce the temperature of the oven to 300 degrees F for another 10 minutes. Remove from oven immediately! Place on a rack to cool slightly before serving.
*Please note: If you wish the eggs to be runny, remove from the oven once the egg whites becomes opaque while the yolks are still jiggly. You will have to keep watch!
Otherwise, 20 minutes will yield eggs that are firm but not overdone.
Every oven is different, so please adjust accordingly and watch the contents while baking.
Enjoy and impress!!!
Monday, February 26, 2018
Joanne's Easy Bake: Peachy Mango No Bake Cheesecake
Joanne's Easy Bake: Peachy Mango No Bake Cheesecake: This recipe is adapted from Kitchen 101. The original recipe called for a cookie base that was too thick and some left-over mango ...
Peachy Mango No Bake Cheesecake


This is a great dessert for great company. It has a mild tart flavor which makes it a refreshing and satisfying dessert at the end of a full meal. The recipe is adapted from Kitchen 101. The original recipe called for a cookie base that was too thick and some left-over mango puree that need not go to waste; so I decided to modify the recipe to suit my purpose. I made this to share with my BIG family during Christmas and New Year of 2017. The recipe will yield a 9" cake or alternatively, if you wish, the filling is sufficient to make two smaller cakes (an 8" and a 6") by varying the amount of chocolate baking crumbs.
Utensils needed:
1 large mixing bowl
Several small bowls to hold the various ingredients
Hand held mixer
Digital kitchen scale
Scraper
Measuring spoons
Measuring cups
A double boiler or pot
9" springform pan with removable bottom
One large plate
Ingredients for cake base:
150 g chocolate baking crumbs or graham crumbs *
4 tablespoons melted unsalted butter
Ingredients for cream cheesecake:
500 g cream cheese at room temperature
500 g mango puree or mango pulp (you may make your own mango puree by pureeing fresh mango)
100 g plain yogurt (do not use fat free)
3-1/2 tablespoon fresh lemon juice
165 g fine granulated sugar
28 g gelatin powder
1 cup water
250 g can peach slices (drained)
Ingredients for the mango gelatin topping:
350 g mango puree
14 g gelatin
1/4 cup water
1 teaspoon lemon juice
Method:
To prepare cake base:
Start by preparing the cake base. Line bottom of springform pan with plastic wrap and place a fitting cake board on top of the plastic wrap. Tighten pan.
Mix chocolate baking crumbs with melted butter. Stir to combine and place into the prepared pan. Spread crumbs evenly over the bottom of the pan and press firmly using the back of a spoon. Then place the pan with the crumb base to chill in the fridge until the cream cheese mixture is ready.
To prepare cream cheese cake:
Drain and cut sliced peaches into small cubes.
Juice the lemon and strain out all seeds.
Measure and prepare all the ingredients.
Combine gelatin powder with cup of water in a heat resistant bowl and let it soak for 10 minutes.
Using a hand held mixer, combine and beat cream cheese with sugar in a large mixing bowl until it is fluffy.
Add yogurt and lemon juice. Beat to combine.
Add mango puree to the mixture and beat to combine evenly.
Heat some water in a pot and bring to a simmer. Place bowl with soaked gelatin over the pot of simmering water and stir until gelatin dissolves and becomes a transparent liquid.
Remove bowl of gelatin from pot and pour melted gelatin into the cream cheese mixture. Stir to combine thoroughly.
Lastly, add the cubed drained peaches. Stir to mix evenly.
Take out chilled cake pan from fridge. Pour the cream cheese mixture into the chilled cake pan. Cover cake pan with a large plate and return cake pan to the fridge to chill for another 15 minutes.
To prepare mango gelatin topping:
While cake is being chilled, prepare the mango gelatin topping.
Turn on the stove and bring the previous pot of hot water to a simmer.
Combine 1/4 cup water with gelatin in the same bowl which you had previously used to melt the gelatin for the cake. Let it sit for 2 minutes.
Then place the bowl with soaked gelatin over the pot of simmering water and stir until gelatin dissolves and becomes a transparent liquid.
Remove bowl of gelatin from pot and turn off heat.
Place mango puree and lemon juice in a mixing bowl. Add melted gelatin, then stir to combine evenly.
Bring the cream cheesecake out from the fridge. Remove large plate. The top of the cake should be slightly firm to touch and not sticky.
Pour mango gelatin mixture over the top of the cake.
Tap the springform pan lightly on the counter top to evenly distribute the mango gelatin mixture.
Cover again with the large plate and return cheesecake to chill in the fridge overnight or for at least 4 hours before serving.
While your cake is being chilled, drain and slice thinly the rest of the peaches and decorate once the cake is completely chilled and firm to the touch.
Bring cake out to sit at room temperature for 20 minutes before slicing and serving.
Enjoy!

You may omit the mango gelatin topping and the cake will look like the above. This last photo was my first trial following the original recipe. I used chocolate baking crumbs instead of graham crumbs; but did not like the thick cookie base and had left over mango puree from the can.
* 180 g chocolate baking crumbs + 5 tablespoons melted unsalted butter will be sufficient to line both 8" and 6" springform pans.
Subscribe to:
Posts (Atom)