Friday, December 11, 2015
Joanne's Easy Bake: Easy - Make Your Own Cranberry Sauce and Juice
Joanne's Easy Bake: Easy - Make Your Own Cranberry Sauce and Juice: Cranberry Sauce/Jam & Juice Long time ago, when I roasted my first Christmas turkey, I used to buy canned cranberry jam f...
Easy - Make Your Own Cranberry Sauce and Juice


Cranberry Sauce/Jam & Juice
Long time ago, when I roasted my first Christmas turkey, I used to buy canned cranberry jam from the grocery store and heat it up according to directions. I thought that was the only way I could get cranberry sauce for my turkey. Fresh cranberries are meant for decorating the platter then. After reading several cook books, I realized how easily one can make cranberry sauce/jam and cranberry juice and will never go back to the canned and bottled stuffs after my first try. Please give this a try and you can have cranberry sauce all over the place - on your turkey, ham, pancakes, ice cream, and whatever you fancy - even on your toasts because cranberries are so Good!
Cranberry Sauce/Jam
Utensils:-
Stainless steel saucepan
Sieve
Wooden spoon
Large measuring cup
Stainless steel ladle
Ingredients:-
6 cups or (680 g or 24 oz) fresh or frozen cranberries
(buy them while in season; fresh cranberries freeze well)
1-3/4 cups granulated sugar
1-3/4cups cold filtered water
zest of one lemon
Methods:-
1. Rinse and drain cranberries and wash lemon before you zest.
2. Place all ingredients into a heavy stainless steel saucepan that has lots of room for cranberries to expand and pop.
3. Bring to a boil over high heat and turn heat to low. Let cranberries simmer until they are soft and most of them are popped, approximately 20 - 25 minutes. Watch the pot as mixture can easily boil over and make a mess!
4. Turn heat off and let it cool off for 15 minutes.
5. Ladle and strain mixture over a sieve using a wooden spoon to press the pulp. Let juice pass through the sieve into a clean bowl or mason jar. Mixture will thicken as it cools. Allow it to cool completely before refrigerating. May keep up to two weeks.
(Makes approximately 4 cups of cranberry sauce/jam).
6. Reserve the pulp in the sieve and return pulp to the saucepan when all is strained, to make cranberry juice! (Waste not, want not)!
To make cranberry juice:
1. Add 1 to 2 cups of cold filtered water to the strained pulp, that which was left after making the sauce, in the saucepan and bring to a boil.
2. Strain the juice over sieve into a jug or measuring cup. Discard the pulp.
3. Pour juice into a nice glass and serve! You now have the real cranberry juice instead of drinking the cocktail that comes in a plastic bottle!
4. If you would like to make more juice anytime, just add water to one or two tablespoons of cranberry sauce/jam, dilute to your taste and serve using your favourite glassware.
If you make the sauce/jam now, it should keep well in a clean glass jar and ready for your Christmas dinner with friends and family! Enjoy!
Friday, December 4, 2015
Joanne's Easy Bake: So Easy - Hearty Butternut Squash Soup
Joanne's Easy Bake: So Easy - Hearty Butternut Squash Soup: Sometime ago, my Uncle Fred, came with several butternut squash that he harvested from his big garden in Niagara. I never thought I...
So Easy - Hearty Butternut Squash Soup


Sometime ago, my Uncle Fred, came with several butternut squash that he harvested from his big garden in Niagara. I never thought I could like anything made of butternut squash until I tasted the best butternut squash soup made by my friend, Mandy, at one of our church's 'lunch and bunch' events. Honestly, it was the best I have ever tasted and she shared with me her way of making it. She uses smoked bacon to give it the smoky flavor which is really ideal for this cold season. But in this version, I omit bacon because one of my boys do not like bacon fat. This can be a totally vegetarian soup if you use vegetable broth instead of chicken or beef broth.
Hearty Butternut Squash Soup
Utensils need:-
Chef knife
Vegetable Peeler
Cutting Board
Large stock pot
Electric Hand blender
Ingredients:-
3 cups butternut squash (peeled and cut into small cubes)
1 stalk leek (including green parts)
1 cup carrots (peeled and sliced into smaller pieces)
1 cup onions (peeled and sliced)
1 cup celery (cut into smaller pieces)
4 pips garlic (skins off)
5 black peppercorns
Dash of nutmeg (optional)
3 cups clear chicken or beef or vegetable broth
Salt to taste
Method:-
Wash thoroughly, peel and cut all vegetables and place them all at once into a large stock pot. Add the broth, peppercorn and bring to a boil over high heat. Once soup boils, turn heat down to low, cover pot and let it simmer for 20 - 25 minutes until all vegetables are tender. Turn off heat. Immerse an electric hand blender into the pot and blend all vegetables until it is in a puree form. Season with salt and a dash of nutmeg. Serve either hot or cold. You will love the creamy and nutty flavor of the butternut squash. It is yummy without adding any cream!
Note: Enjoy and hope you won't turn 'orange' by eating too much of this!
Wednesday, November 25, 2015
Joanne's Easy Bake: Easy Fruits and Custard Parfait
Joanne's Easy Bake: Easy Fruits and Custard Parfait: As the year comes to an end, many things need get done and time is always a constraint when it comes to eating at home in a nice set...
Easy Fruits and Custard Parfait


Easy Fruits and Custard Parfait
As the year comes to an end, many things need get done and time is always a constraint when it comes to eating at home in a nice setting. This is a pretty easy dessert that can be prepared 2 days ahead of time and assembled in a jiffy. It is both refreshing and light, a perfect late supper finale.
Ingredients:-
Custard Filling (A)
1-3/4 cups + 1/4 cup skim milk
1/3 cup + 1/4 cup granulated sugar
1/4 cup all purpose flour
6 large egg yolks
2 teaspoons pure vanilla essence
2 teaspoons pure vanilla essence
1/8 cup unsalted butter (cubed) at room temperature
8 oz or 1 cup or 227gm mascarpone cheese at room temperature
Toppings (B)
2 cups fresh strawberries (washed, hulled and halved)
2 pints fresh blue berries (rinsed and dried)
Method:-
To make custard filling (A):-
Place 1-3/4 cups milk and 1/3 cup sugar into a medium sized saucepan and heat over medium heat until milk comes to just about to boil, stirring occasionally.
In a separate bowl, whisk egg yolks with 1/4 cup milk, 1/4 cup sugar and 1/4 cup flour until there is no lump. (To make it faster, just pass the mixture through a fine sieve).
Once milk is about to boil, remove saucepan from heat and whisk in egg mixture.
Return saucepan to heat and cook over medium heat until mixture thickens and comes to boil, whisking continuously. Continue to stir for another one to two minutes until mixture thickens.
Remove from heat.
Add vanilla and butter. Whisk to combine and until custard is smooth.
Cover with a plastic wrap immediately (to prevent skin from forming on top of custard) and let it cool. When it is cold enough, place custard in the fridge to cool until custard is thick.
Meanwhile, whisk mascarpone cheese until it is smooth in a separate bowl by just using a wire whisk.
Add mascarpone cheese to cold custard and whisk until smooth.
Set aside to chill in the fridge again until ready to use (can be refrigerated for 2 days).
Assembling:-
Chill 6 tall glasses or parfait glass. Divide the chilled custard and spoon into the glasses. Top them with (B) pre-washed fresh strawberries and blue berries. Serve them chilled. Don't forget to lick the spoon and enjoy!
**Note: You may line the inside bottom of the glass with some lady finger biscuits dipped in your favourite espresso before you spoon the custard into the glass!
Thursday, November 19, 2015
Joanne's Easy Bake: Easy Slow Roasted Ham Using Coke
Joanne's Easy Bake: Easy Slow Roasted Ham Using Coke: Easy Slow Roasted Ham Using Coke Whenever picnic shoulder ham goes on sale, I will always get one and use this very eas...
Easy Slow Roasted Ham Using Coke


Easy Slow Roasted Ham Using Coke
Whenever picnic shoulder ham goes on sale, I will always get one and use this very easy method to prepare for an entree that will last two to three meals. My uncle, Fred, taught me this when I first arrived in Toronto. If you get tired of having it for dinner, you may always use the leftovers, after your first meal, for sandwiches or salads. I will roast it on weekends since weekdays are near impossible to cook and find this to be most convenient. Please remember to save the big bone for your stock!
Utensils:-
1 large heavy stock pot that fits the ham and plenty of room for water to cover the ham
1 large stainless steel or any available roasting pan
Ingredients:-
1 whole smoked pork picnic shoulder
1 stalk of leek (both green and white parts)
1 large onion
1 carrot
1 stalk of celery
1 can of Coke
10 cloves
2-3 litres cold filtered water
Method:-
1. Remove plastic packaging and rinse the meat.
2. Place the whole picnic shoulder into the stock pot and fill the pot with cold filtered water until ham is mostly submerged in the water.
3. Place the filled pot over your stove and bring to a boil. Turn down the heat and let it simmer for one hour.
4. Meanwhile, wash and cut leek, large onion, carrot and celery.
5. Evenly spread all cut vegetables in the roasting pan.
6. Preheat oven to 325 degrees F.
7. Once meat is ready, remove from stock pot and place with skin side up, on top of the bed of vegetables.
8. Stud the ham with cloves.
9. Pour two cups of the stock from the pot into the roasting pan and pour the can of Coke over the ham.
10. Place in center rack of preheated oven and let it roast for 3 hours. (Do not let any part of the meat touch the heating element. If space is a concern, lower the oven rack.)
11. Set your timer and go about doing other things.You may baste the ham in between cooking time with stock from the pan, but not necessary.
12. When ready, turn off oven, rest and tent the ham on your counter and remove cloth mesh before slicing and serving. Enjoy your dinner! Yum!
***Don't forget to save the big bone for making stock. If you cannot use it immediately, just freeze the bone.
Monday, November 9, 2015
Joanne's Easy Bake: Easy Microwave Poached Eggs
Joanne's Easy Bake: Easy Microwave Poached Eggs: I love poached eggs; but making poached eggs require such skills and patience from methods taught by the cooking gurus which make m...
Easy Microwave Poached Eggs


I love poached eggs; but making poached eggs require such skills and patience from methods taught by the cooking gurus which make me shun poached eggs for a long time. Until one day when I decided to give the microwave method a try. It was through many trials and errors and the eggs exploded in the microwave oven, giving me clean up nightmares! I am going to share what has been tried and this no fail method will make having poached eggs more enjoyable :)
Ingredients
2 large eggs from the fridge
3 cups cold filtered water
Dash of black pepper and salt.
Utensils and equipment
1200 watts microwave oven
Slotted spoon
A deep stoneware bowl
Method
**Note: Be careful when microwaving eggs - ensure that shells are always removed and that you place enough water to cover the eggs completely. To prevent eggs from exploding, do not overcook the eggs in the microwave. Cooking time may vary with the wattage of microwave ovens.
Fill the bowl with water.
Crack both eggs into the bowl filled with water. Throw away the shells. Do not pierce or break the eggs.
Place bowl in the microwave oven and cook for 4 minutes. If you wish the whites to be less runny, you may add 30 seconds to your cooking time.
Remove bowl from microwave oven carefully without scalding yourself.
Using the slotted spoon, dish out the eggs and place them on your serving plate.
Serve with a dash of freshly ground black pepper and salt.
Lay back and enjoy your breakfast!
Friday, October 16, 2015
Joanne's Easy Bake: Easy Blueberry/Cranberry Tea Cake
Joanne's Easy Bake: Easy Blueberry/Cranberry Tea Cake: This is an almost no fail recipe for a nice and simple tea cake which tastes quite like a pound cake and is excellen...
Easy Blueberry/Cranberry Tea Cake
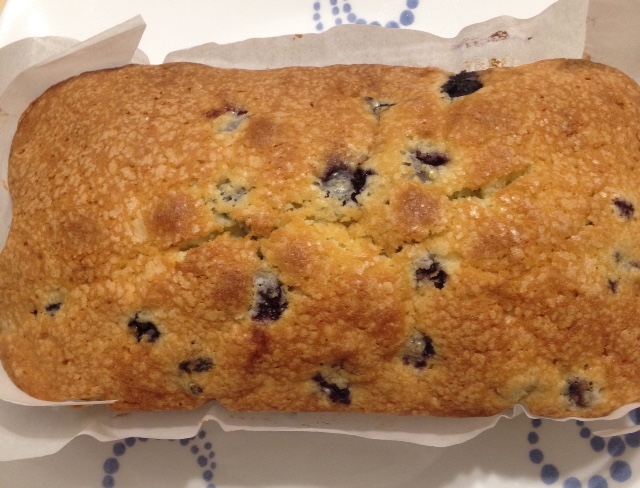

This is an almost no fail recipe for a nice and simple tea cake which tastes quite like a pound cake and is excellent for your afternoon tea/coffee break or even breakfast with a glass of milk. I made this for my fellowship members at church and also for my relatives, friends and neighbours and it is always thumbs up because it is so easy to make.
Blueberry or Cranberry Tea Cake
Ingredients:-
1 1/2 cups all-purpose flour1 teaspoon baking powder1/2 teaspoon salt1/2 cup softened unsalted butter, cubed1 cup granulated sugar2 eggs1/4 cup whipping cream1 cup fresh blueberries or cranberries
Method:-
Preheat oven to 350 degrees F or 170 degrees C.Line loaf pan with parchment paper or oil and flour pan if not using parchment paper.Sift together flour, baking powder and salt into mixing bowl.Stir in butter, sugar, eggs and whipping cream.Beat with an electric hand mixer for 3 minutes or until mixture is smooth and some air has been incorporated.Stir in blueberries/cranberries.
Scrape into prepared loaf pan and bake until cake tester inserted comes out clean. The top should be a nice golden brown; baking time is 45 minutes to 1 hour. Remove cake from pan after resting five minutes and place on wire rack to cool.May keep two days if wrapped.
Try it! It makes a good hostess gift when invited for afternoon tea.
Wednesday, September 9, 2015
Joanne's Easy Bake: Easy Black Sesame Mochi (Loh Mai Chi)
Joanne's Easy Bake: Easy Black Sesame Mochi (Loh Mai Chi): When I was a kid, mom used to get these mochi fresh from the wet market for me every morning. They remain my favorite and I h...
Easy Black Sesame Mochi (Loh Mai Chi)


When I was a kid, mom used to get these mochi fresh from the wet market for me every morning. They remain my favorite and I had always been looking to buy them from the bakery here. Unfortunately, they are either not fresh or too sweet for my sweet tooth. I accidentally stumbled upon this idea when I did not know what to do with my left over 'ping pei' moon cake skin.
Ingredients for mochi:-
250 g skim milk
70 g glutinous rice flour
50 g rice flour
20 g all-purpose flour
10 g canola oil
40 g condensed milk
50 g granulated sugar
½ cup cooked glutinous rice flour (guo fun)
1 teaspoon canola oil for greasing the plate
Method:-
1. Sieve glutinous rice flour, rice flour and all-purpose flour into a large mixing bowl. Add sugar and whisk to combine.
2. Add milk in two portions and whisk to combine. Then add condensed milk and whisk to combine. Lastly, add canola oil to mixture and whisk to combine to make a thick batter.
3. Lightly brush a 2” deep by 8” wide, heat proof plate all over with canola oil or use any deep heat proof plate that will fit your steamer. Strain the batter through a sieve into the prepared deep plate to remove lumps.
4. Place plate in a steamer and steam on high heat for 20 minutes or until toothpick inserted comes out clean.
5. Remove from heat and let cool until it is slightly warm. Put on a pair of food safe gloves, scrape and loosen custard from plate, and knead custard until it becomes a smooth and shiny lump of dough. Form into a log and wrap with plastic wrap. Refrigerate until ready to use.
6. Meanwhile prepare ‘guo fun’ by frying glutinous rice flour in a clean frying pan for 10-15 minutes until flour is slightly yellowish. Dish out into a bowl and let it cool before using.
Ingredients for the black sesame filling:-
1 cup coarsely ground black sesame
3 tablespoons pure peanut butter
3 tablespoon granulated sugar
Method:-
Mix all the above ingredients together in a bowl.
How to form mochi:-
1. Put on a pair of food safe gloves before handling the dough. Divide and weigh the dough into 40g each. Form into a round ball. Set aside onto a plate lined with plastic food wrap until all the dough is divided and weighted completely.
2. Roll out each dough portion in between two sheets of plastic food wrap into 1/8 of an inch thick. Cupped your palm and place the flattened dough in your palm forming a shallow cup.
3. Spoon approximately one and a half tablespoons of the black sesame filling into the center of the dough. Gather the edge of the dough with your other hand and pinch as you close the edge. If filling spills out as you gather the edge, gently press and push the filling into the center with the thumb of your hand that is holding the pastry. Close the opening and form into a round ball.
4. Dip the ball of mochi into the bowl of 'guo fun' to coat the mochi completely. Shake of extra 'guo fun' and place mochi on a plate to serve. Enjoy with your loved ones; be a listener and don't talk while you are eating mochi...danger of choking!!! They are so good, so let others do the talking :)))
*These mochi freeze well or you may refrigerate in a covered container for two days.
Thursday, September 3, 2015
Joanne's Easy Bake: Hello Kitty Snow Skin Moon Cakes
Joanne's Easy Bake: Hello Kitty Snow Skin Moon Cakes: Hello Kitty Moon Cakes with Black Bean Filling - Red food coloring added for pink effect. Using a different mold for variety. Mo...
Joanne's Easy Bake: Milk Custard Snow Skin Moon Cakes
Joanne's Easy Bake: Milk Custard Snow Skin Moon Cakes: Snow Skin Moon Cakes with Milk Custard Fillings. Utensils needed for making Snow Skin Moon Cakes- pastry brush, small rolling pin, m...
Milk Custard Snow Skin Moon Cakes
 |
| Snow Skin Moon Cakes with Milk Custard Fillings. |
 |
| Utensils needed for making Snow Skin Moon Cakes- pastry brush, small rolling pin, moon cake mold and plastic knife. |
 |
| Divide and weigh the skin dough and filling dough into individual balls. |
 |
| The inside of a Milk Custard Snow Skin Moon Cake. Erik and Jonathan love milk custard (lai wong) and whenever we go out for dim sum, the meal will never be complete without 'lai wong bau'! I searched high and low for a 'lai wong' recipe to improvise this Milk Custard Snow Skin Moon Cake. Give it a try if you are also a 'lai wong' lover and without a doubt, I love it too!
Milk Custard Snow Skin Moon Cakes
Recipe for the Milk Custard (lai wong) Filling
Ingredients:-
60 g Bird’s Eye Custard Powder
40 g Carnation Skim Milk Powder
45 g granulated sugar
70 g full cream Carnation Evaporated Milk
110 g Aroy-D coconut milk
25 g melted unsalted butter
1 medium egg
1 teaspoon canola oil for greasing the steaming plate
Method:-
1. Place custard power, milk powder and sugar in a large mixing
bowl. Whisk to combine.
2. Add evaporated milk and coconut milk to dry mixture. Whisk
to form a smooth batter without lumps.
3. Lightly whisk egg in a separate bowl. Then add to batter.
4. Lastly add melted butter (must be added last).
5. Lightly grease a 2”
deep by 8” wide heat proof plate with canola oil, strain batter into plate to
remove any remaining lumps and place in a steamer. Steam on high for 8 – 10
minutes until toothpick inserted into custard comes out clean.
6. Remove from steamer and let cool until it is warm to touch.
7. Put on a pair of food safe gloves, scrape custard from plate and knead until it
forms a smooth and shiny dough. Form into a log shape and wrap with plastic
wrap. Chill in fridge until ready to use when skin dough is ready.
8. When skin dough is ready, remove chilled filling dough from
fridge, weigh and divide into portions of 30 g each. Roll each portion into a
ball. Now you are ready to wrap the filling with the skin dough.
*Please refer to the Hello Kitty Snow Skin Moon Cakes in this blog for
the dough recipe and how to form the moon cakes.
*This filling freezes well for at least 2 weeks! So make ahead and enjoy your moon sighting over a cuppa tea!*
|
Hello Kitty Snow Skin Moon Cakes
 |
| Hello Kitty Moon Cakes with Black Bean Filling - Red food coloring added for pink effect. |
 |
| Using a different mold for variety. |
 |
| Moon Cake Molds. My friend, Katrina, loves making sweets (that are not too sweet) and cooking for her family and has asked if I could share this in time for the coming Mid-Autumn Festival. This might be a bit intimidating for any beginner, but once you have tried it, you will not regret because they taste really fresh and good if you make them yourself! Recipe for the Black Bean Filling |
Ingredients:-
240 g black beans
80 g sugar
½ teaspoon baking soda
10 g canola oil
2 tablespoons wheat starch
Method:-
1. Wash and soak black beans for at least 3 hours.
2. Drain and place beans and baking soda into a heavy pot and add enough water to cover the beans with ¼ inch water over the top. Bring to boil and lower heat to simmer for 20 minutes. Turn off heat and cover pot with lid and let sit for another 30 minutes.
3. Drain off any excess water and place cooked beans in a food processor. Add sugar and continue to blend until beans becomes a fine paste.
4. Remove from food processor and place the bean paste into a clean frying pan. Add canola oil to paste and fry in low heat until bean paste is dry.
5. Add wheat starch and fry for another 10 minutes.
Remove from pan and place in a large mixing bowl.
6. When it is cool enough to touch without burning your hands, put on a pair of food safe gloves and knead paste until it becomes smooth and shiny. Form into a log and wrap with plastic wrap and refrigerate until ready to use.
7. Remove bean log from the fridge when moon cake skin is ready, divide and measure into 30 g portions each. Form and roll each portion into a ball.
Recipe for the Snow Skin
Ingredients:-
250 g skim milk
70 g glutinous rice flour
50 g rice flour
20 g all-purpose flour
10 g canola oil
40 g condensed milk
50 g granulated sugar
½ cup cooked glutinous rice flour (guo fun)
1 teaspoon canola oil for greasing the plate
Method:-
1. Sieve glutinous rice flour, rice flour and all-purpose flour
into a large mixing bowl.
Add sugar and whisk to combine.
2. Add milk in two portions and whisk to combine. Then add
condensed milk and whisk to combine.
Lastly, add canola oil to mixture and whisk to combine to make a thick batter.
3. Lightly brush a 2” deep by 8” wide, heat proof plate all over with canola oil or use any deep heat proof plate that will fit your steamer. Strain the batter through a sieve into the prepared deep plate to remove lumps.
4. Place plate in a steamer and steam on
high heat for 10 minutes or until toothpick inserted comes out clean.
5. Remove from heat and let cool until it is slightly warm.
Put on a pair of food safe gloves, scrape and loosen custard from plate, and knead custard until it becomes a smooth
and shiny lump of dough. Form into a log and wrap with plastic wrap. Refrigerate until ready
to use.
6. Meanwhile prepare ‘guo fun’ by frying glutinous rice flour
in a clean frying pan for 10-15 minutes until flour is slightly yellowish. Dish
out into a bowl and cool before using.
How to form moon cake:-
1. Remove skin dough from the fridge, divide and measure dough
into portions of 20 g each and form each portion into ball shape.
2. Roll out and
flatten each portion using a rolling pin and by placing each portion in between
two sheets of cling wrap.
3. Wrap each portion of the black bean filling with the flattened skin dough and form into a smooth round dough.
4. Dip the stuffed dough into
the bowl of ‘guo fun’.
5. Lightly brush the moon cake mold with ‘guo fun’and
gently press the stuffed dough into the mold.
6. Smooth out the base and press handle to
release the dough onto a flat surface. Transfer to a plate lined with plastic
wrap and chill before serving.
They freeze well and you just have to defrost in the refrigerator (not at room temperature to prevent condensation) before serving.
Enjoy with your family and friends on a dreamy moonlit
night!
*Tip: brush the mold with ‘guo fun’ and shake off any
excess flour every time before forming the next cake to ensure easy release of the
cake.
*Snow skin recipe adapted from SiuKitchen*
*Snow skin recipe adapted from SiuKitchen*
Saturday, August 15, 2015
Joanne's Easy Bake: Easy Peel - How To Remove Egg Shells in a Jiffy
Joanne's Easy Bake: Easy Peel - How To Remove Egg Shells in a Jiffy: I used to spend hours removing the shells from the hard boil eggs and very often I took off most of the egg white with the shells...
Easy Peel - How To Remove Egg Shells in a Jiffy


I used to spend hours removing shells from the hard boil eggs and very often I took off most of the egg white with the shells or sometimes dropped a whole lot of broken shells into my egg salads. Finally I learned a way to do it easily from watching one of those 'kitchen hacks' and bravo, this has saved me so much frustration!
Method:-
Make sure you are able to hold the hard boiled eggs without burning your fingers. Gently crack the bottom on the wide end of the egg, remove some shells to make a small opening and gently slide a dessert spoon under the skin lining. Push the spoon and rotate the spoon at the same time following the contour of the egg until the tip of the spoon reaches the pointy part of the egg. Then remove the shell as a piece and rinse the egg of any tiny shell residues. There you have a nice peeled hard boiled egg! Enjoy! Photo courtesy, my dearest hubby, Erik.
Thursday, August 13, 2015
Joanne's Easy Bake: Easy Sandwiches - Egg Salad Sandwich
Joanne's Easy Bake: Easy Sandwiches - Egg Salad Sandwich: My friend, Ruth, came for a gathering and liked the egg salad sandwich that was served. This is fairly easy to make except for peelin...
Easy Sandwiches - Egg Salad Sandwich


My friend, Ruth, came for a gathering and liked the egg salad sandwich that was served. This is fairly easy to make except for peeling the egg shells. I will post how to peel off the egg shells in a jiffy in another post. The ingredients that add a kick to the egg salad are the fresh chives and mustard powder. If you don't have them on hand, you may do without and add finely diced spring onions instead.
Egg salad
Ingredients:-
Fresh bread or toasts, your favorite (can be any kind)
Some butter at room temperature (for spreading on bread or toasts)
9 large hard boiled eggs
4 tablespoons finely chopped fresh chives
1/2 teaspoon sea salt
4 tablespoons mayonnaise
1/4 teaspoon mustard powder
Dash of coarse ground black pepper
Method:-
Remove shells from eggs. Place in a large mixing bowl. Mash eggs with a fork and add chopped chives,sea salt, mayonnaise, mustard powder and black pepper. Mix well and spread on buttered toasts or fresh sandwich bread.
Cut and serve. Enjoy this with your friends or family over a cuppa mocha or green tea and have a nice chat and lots of laughters!
Friday, August 7, 2015
Joanne's Easy Bake: Easy Chicken Rub
Joanne's Easy Bake: Easy Chicken Rub: We used to enjoy buying roast chickens from our local supermarket, but after a little while, we found that they are too salt...
Easy Chicken Rub


We used to enjoy buying roast chickens from our local supermarket, but after a little while, we found that they are too salty. To satisfy our cravings for the roast chicken, I decided to experiment with this and from the first time on, this has become Erik's and my two boys' favorite. Normally I would buy fresh herbs, rinse and dry them and use them to make my own rubs. My neighbor has a tarragon plant that grows all over the place and even over to my garden. Instead of throwing them out when I cut them down, I would pick all the tender leaves, dry them and store them in a glass jar to be used for this rub.
This recipe is sufficient for one whole chicken, which I usually cut into half to speed up the baking time.
Rub Ingredients:-
All ingredients are dry ingredients
1 teaspoon crushed rosemary
1 teaspoon ground sage
1 teaspoon crushed tarragon
1 teaspoon sumac
1 teaspoon ground cumin
1 teaspoon coarsely ground black pepper
1 teaspoon garlic powder (not garlic salt)
1 teaspoon brown sugar
2 teaspoons tumeric powder
2 teaspoons sea salt
1 tablespoon onion powder (not onion salt)
Pre-heat oven to 375 degrees F.
Place all the ingredients (except the chicken) in a bowl and mix to combine. Transfer into a shaker and shake all over dressed chicken. Place chicken on a lined baking tray and bake in pre-heated oven until juices run clear. Remove from oven and tent chicken by covering it loosely with an aluminium foil and letting it sit for 15 minutes. Drain the chicken fat and reserve the remaining juices for dipping or use as gravy for the chicken.
Enjoy it with your friends and family and have a nice chat over dinner! Left overs can be used for chicken salad. Don't waste :)
Subscribe to:
Posts (Atom)