Tuesday, July 30, 2019

Spicy Hot Pepper Oil With Miso & Garlic


This is Matthew's favourite hot pepper garlic oil and it is by his request that I post this recipe here. I don't know about others, but to me, boys are funny creatures. Most of them think that their mom's cooking is the best when they are still living with mom and the moment they got married and moved out, they will think that their wives are the best cooks! Matthew, my youngest, loves spicy foods and most of the time, anything with 'chillies' are his accompaniments during every meal. This hot pepper oil is his favourite! The reason for making this was mainly to ensure that the ingredients used are as good as they can be and that we may have it regularly without worrying what kind of oil is used and without doubts in consuming it often, compare to the imported store bought stuffs. There are no fancy complicated ingredients in this spicy oil but it does tastes super and make any dish comes alive!!!

Spicy Hot Pepper Oil with Miso & Garlic

Utensils require:

1 heavy bottom stainless steel pot (2 - 2.5 qt)
A wooden spoon
Chopping or cutting board or garlic chopper
Chef knife
Several clean glass jar with lids for storing the finished product

Ingredients:

283 -300 g crushed hot pepper flakes 
(in plastic packages or bottles)

1 cup of finely minced fresh garlic 
(approximately 3 whole heads)

5-6 tablespoons of miso paste (soya bean paste) 
(may use reduced sodium or regular depending on your salt intake)

4 cups of avocado oil or any cooking oil that can be used for frying 
(do not use olive or peanut oil because the former should be used cold and the latter can turn rancid easily)

5-6 teaspoons regular fine sea salt 
(use less if you use regular miso paste)

Method:

1. Peel to remove all the outer skins of the fresh garlic. Crushing them first with your knife on a chopping board will make the process easier.
2. Chop and mince garlic finely.
3. Place all the hot pepper flakes, miso paste and minced garlic into the heavy bottom stainless steel pot.
Combine the ingredients and make sure the miso paste are not in large clumps.
4. Pour the avocado oil over the hot pepper flakes.
5. Set the pot on the stove and turn the heat on to MEDIUM or MEDIUM LOW.
6. Cook for 40 - 45 minutes, stirring occasionally with the wooden spoon and make sure the bottom doesn't stick or burn.
7. You will notice that the hot pepper flakes will turn darker in colour, the garlic will become fragrant and the oil will turn from pale yellow to a rich amber colour as you cook.
8. Add salt to taste and stir to combine.
9. Turn off stove and let cool. Store them in clean glass jars with lids and in the fridge. You will get to enjoy them for as long as they will last. Excellent with your favourite pizza or wonton noodles or dumplings or fried rice! As for Matthew, it's excellent with everything except with milk and muffins!
Enjoy!


***Please note: When cooking oil, please ensure that your DO NOT LEAVE the pot unattended at any time during your cooking!!! You DO NOT want to set your house on fire!!!


Monday, July 8, 2019

Joanne's Easy Bake: Easy Coconut Pound Cake

Joanne's Easy Bake: Easy Coconut Pound Cake: There is nothing better than making your own cakes and eating them! This is a delicious, y...

Easy Coconut Pound Cake


There is nothing better than making your own cakes and eating them! This is a delicious, yet easy to make coconut pound cake adapted from a recipe by Sarah Carey in Everyday Foods. As usual, when making all cakes, one has to ensure accurate measurements of ingredients. Measuring out the ingredients is the most time consuming part of making any cake other than decorating it. I made this many times without fail but when I tried making it in Malaysia for my parents and relatives, it became a disaster; probably due to the moisture content in the flour in hot climate. Instead of measuring 2 cups of flour, scooped and leveled, I had to adjust the flour amount to 400 g in order for the cake to turn out right. This recipe is mainly for my friend, Helen Wong, whose office is near mine. She asked me for it because her son loves it when I chanced to share the cake with her. Hope it will be her family's favorite and yours too!

Utensils needed:-

1 x Shallow baking tray
1 x 9"x 5" loaf baking pan
Silicone spatula
Scale
Bowls
Measuring spoons
Several bowls and mixing bowls
Wire whisk
Electric hand mixer
Parchment paper

Ingredients:-

170 g unsalted butter at room temperature
1 cup granulated sugar
1 teaspoon pure vanilla extract
3 large eggs at room temperature
2 cups all-purpose flour (scooped into the measuring cup and leveled using a knife or spatula)
1&1/2 teaspoon baking power
1/2 teaspoon fine sea salt
1 cup + 2 tablespoons *buttermilk (save 2 tablespoons for decorating the cake when cooled) 
1&1/2 cups unsweetened shredded coconut (or desiccated coconut) lightly toasted (save 1/4 cup for decorating cake when cooled)
1 cup confectioner's sugar (icing sugar) (for decorating the cake when cooled)

*(make your own buttermilk by adding 1 tablespoon white distilled vinegar to one cup of whole milk or 1%/2%/skim milk; gently stir once and let the mixture sit for 20 minutes)

Method:-

Preheat oven to 350 degrees F and line the loaf pan with parchment paper.

Line the shallow baking tray with parchment paper and place the 1&1/2 cups shredded coconut to toast it lightly - for 3 minutes at 200 degrees F or until it is just slightly brown. Watch it carefully because it can brown and burn easily. Once toasted, set aside to cool and save 1/4 cup for topping the cake when cooked and cooled.

Measure out all the ingredients and place them individually in separate bowls.

Place the all-purpose flour, baking powder, sea salt in a large mixing bowl. Stir to mix thoroughly using a wire whisk.

Using another large mixing bowl, place butter and sugar together into the mixing bowl. Beat butter and sugar together using an electric hand mixer on medium to high speed until it looks pale and fluffy. Scrape down bowl as you beat.

Add and beat vanilla extract into the butter mixture until well mixed.

Then beat in eggs, one at at time (make sure each egg is well beaten into the butter and sugar each time). Scrape down bowl as you beat.

Turn mixer speed to low and add flour mixture in three separate additions to the butter mixture, alternating the first two flour additions with 1/2 cup of buttermilk after each addition of flour. (Meaning you beat in 1/3 portion of flour, followed by beating in 1/2 cup of buttermilk, another 1/3 portion of flour, followed by the rest of 1/2 cup of buttermilk and ending with the last 1/3 portion of flour). Mix well after each addition but DO NOT over beat. Turn off your electric mixer.

Lastly, add in the 1&1/4 cups of toasted shredded coconut, mix into the cake batter by hand until just combined, using a spatula.

Transfer batter into prepared loaf pan, place pan into the preheated oven and bake for 45-60 minutes until cake tester/toothpick inserted into the center of cake comes out clean. Turn off oven and remove loaf pan from oven.

Remove cake from loaf pan 10 minutes after removing from oven. Set cake to cool completely on a wire rack.

Mix 1 cup of confectioner's/icing sugar with 2 tablespoons of buttermilk. Leave cake on wire rack; using a spoon, drizzle the icing over the top of cake and sprinkle the top with 1/4 cup of toasted shredded coconut.

Cut and serve with your favorite coffee/tea/milk. Cake stores well in freezer when wrapped with plastic food wrap and zipped in a freezer bag for up to a week. Defrost in the fridge and serve when needed.

Enjoy!!!


Wednesday, August 29, 2018

Joanne's Easy Bake: Easy Barbecue Sauce

Joanne's Easy Bake: Easy Barbecue Sauce: Summer days will still be around for a while with many days left to use the grill for chicken wings. I used to buy Bull's-Eye BBQ...

Easy Barbecue Sauce


Summer days will still be around for a while with many days left to use the grill for chicken wings. I used to buy Bull's-Eye BBQ sauce to marinade the wings. Recently I found it easier to make my own since I have all the ingredients in my pantry and fridge. The best thing about making your own is that you may make only as much as you need and you don't need to have all the left over sitting in the bottle forever.

Try this and you will know how good it tastes! If you want a spicy version, feel free to add some cayenne pepper powder to zest up the heat. I also used this sauce in my pulled pork filling for sandwiches.

Utensils

Measuring cups and spoons
A small heavy bottom gravy pot
Wooden spoon

Ingredients

Tomato ketchup (your own favourite brand)
2 tablespoons cooking molasses
2 tablespoons sherry or any sweet wine
2 teaspoons onion powder (NOT onion salt)
A dash of cayenne pepper powder (optional)

Method

Measure and place all ingredients in the gravy pot. Stir with wooden spoon to combine thoroughly. Place pot on the burner and turn heat on to medium. Stir occasionally to prevent burning and bring the sauce slowly to a boil. When it starts to bubble, remove from the stove and cool before using.
Enjoy!

*Enough for 1 pound chicken wings.


Thursday, August 9, 2018

Joanne's Easy Bake: Easy Peasy Rice Paper Rolls

Joanne's Easy Bake: Easy Peasy Rice Paper Rolls: If one is looking for gadgets to make Asian foods, Chinese supermarkets in Toronto are definitely one of thos...

Easy Peasy Rice Paper Rolls


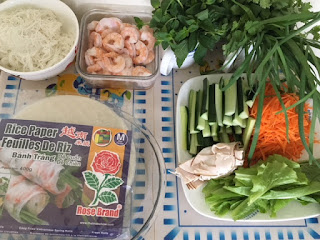
If one is looking for gadgets to make Asian foods, Chinese supermarkets in Toronto are definitely one of those amazing places to go to for anything Asian; sometimes even better than in Asia itself! I was in the section where everything Vietnamese was stocked, when I found these colander like plastic plates which come in a pack of 12. They are made specially for rolling rice paper rolls and I was curious to see if they will really work. Since they are of reasonable price, I thought I will just buy and give them a try. My past experience with rice paper was truly frustrating. Once they are soaked in water, they tend to stick together easily regardless what surface one is working on! In the end, I made these rice paper rolls once and never make them again until recently with the help of these plates. My verdict - these plastic plates are a good buy if you are one who love making your own rice paper rolls at home! To make the process more effortless, I used cooked cold cuts instead of boiling a raw chunk of pork belly and slicing it on my own. In this recipe, I used packaged cold cut turkey and they are really lean and tasty! You may vary all the ingredients to suit your taste.

Utensils Needed:-

Colander like plastic plates (12 units) (if you can get them)
Or any suitable clean working surface (kitchen counter or plastic cutting boards)
A deep heat proof round plate (large enough) to drag the rice papers
Small stainless steel pot
Serving plates and bowls to hold your various ingredients

Ingredients for the rolls:-

18 cooked and chilled large shrimps without shells and tails (you may buy and thaw frozen cooked shrimps)
Cooked cold cuts (I used cold cut turkey) you may use chicken or ham or roast beef (your choice)
(Cut out 24 pieces into a rectangular size of approximately 1" x 2")
36 pieces of mint leaves
36 pieces of cilantro/parsley (only the tender leafy parts, discard the hard stems)
12 stalks of fresh garlic chives (cut into 3" length) (use only the green part)
12 pieces of head lettuce (or any lettuce of your choice) (you want only the leafy part)
1 whole carrot shreded
3 cups of cooked rice vermicelli (cooked, drained & cooled)
24 pieces of English cucumber (in strips of approximately 1/4" x 2")
12 sheets of rice paper
3 cups water
Extra water for boiling rice vermicelli

Method:-

Rinse the shrimps and set aside.

Fill the pot with about 1-1/2 cups of water and bring to boil.

Place shrimps in boiling water and cook over high heat until shrimps just turn pink.
Remove from heat and drain shrimps. Run cold tap water over shrimps.
Drain, shell and devein shrimps. Slice each shrimp into half by running your knife horizontally along the back of the shrimp. Arrange shrimps in a plate and set aside for use.

Using the same pot, fill it half full with water and bring to a boil. Place the dried rice vermicelli into the boiling water, let it soften and becomes opaque. Remove from heat and drain. Set aside in a plate to cool.

Rinse all the vegetables and herbs (lettuce, cilantro/parsley, mint and garlic chives) separately, drain and spin dry. Tear out the leafy parts of the lettuce and discard the hard center stalk.

Cut or tear the different herbs into sizes and set aside for use.

Scrape off carrot skin, wash, dry and julienne or cut into strips like matchsticks. Set aside.

Rinse cucumber and cut into strips of 1/4" x 2". Keep skin on.

Cut cold cut meats into size and set aside for use.

To make the hot water bath for the rice paper, pour 1-1/2 cups of filtered drinking water into the deep heat proof round plate. Place in microwave oven on high for 1 minute or until water is just slightly steaming but not boiling. Remove from microwave and set plate of hot water bath onto a flat steady work surface.

Drag each piece of rice paper briefly in the plate of hot water bath and place individually onto plastic plates. You don't need to shake off the excess water since the plastic plates will drain away any excess water as you work on the rolls. Repeat for all 12 sheets and stack the plates with the rice paper one on top of the other.

Then you may start rolling the rice paper rolls starting with the sheet on the first plate.

Begin by lining the rice paper with 2 pieces of lettuce about 1/3 from the edge of the rice paper closest to you, then start stacking two pieces of cucumber strips horizontally on top of the lettuce, about 2 tablespoons of julienne carrots on top of the cucumbers, about 3 tablespoons of rice vermicelli on top of the carrots, arrange 3 pieces of mint leaves one after another and 3 pieces of cilantro/parsley one after another horizontally on top of the vermicelli.

Then place 2 pieces of cold cut by arranging them horizontally beyond and above the vermicelli and 3 pieces of halved shrimp by arranging them horizontally one after another beyond and above the cold cut.

Fold the rice paper by lifting the bottom end over the vermicelli, then fold both ends on your left and right towards the center like an open ended envelope; then lift the roll slightly from the bottom using both thumbs and roll all the way to the top of the sheet making sure that the ingredients are not falling out on either the left and right ends.

Just before you reach the top of the sheet, place a piece of the garlic chive horizontally on the sheet leaving about 1 inch of the chive to stick out from one end.

Then complete the roll by rolling over the chive all the way to the end of the sheet. The rice sheet will seal itself. Just pat on it lightly to ensure that the seal is tight. Remove from plastic plate.

Place roll on a serving plate and cover with plastic food wrap to prevent drying out as you continue to finish all the 12 sheets. Repeat the process until you are done with the sheet on every plastic plate.

Ingredients for the dipping sauce:-

2 tablespoons Chinese barbeque sauce
2 pips garlic (finely minced)
1 teaspoon sesame oil
1 tablespoon pure peanut butter
3 teaspoons filtered water.

Method for dipping sauce:-

Place all ingredients in a small gravy pot and cook over low heat, stirring until it boils. Remove and pour into a serving bowl to use as dipping sauce for the rice paper rolls.

Enjoy!

Note: I find it a little tedious preparing the ingredients, but the rolling part is super easy and swift with the use of these special plastic plates. I will want to make these rolls again. After all, nothing is better than being able to vary the ingredients in the rolls when you are able to make them yourself!