Wednesday, May 30, 2018
Joanne's Easy Bake: Breakfast Egg Cups
Joanne's Easy Bake: Breakfast Egg Cups: Breakfast Egg Cups These breakfast cups are sure to impress and are easy to assemble once you get the hang of i...

Breakfast Egg Cups




Breakfast Egg Cups
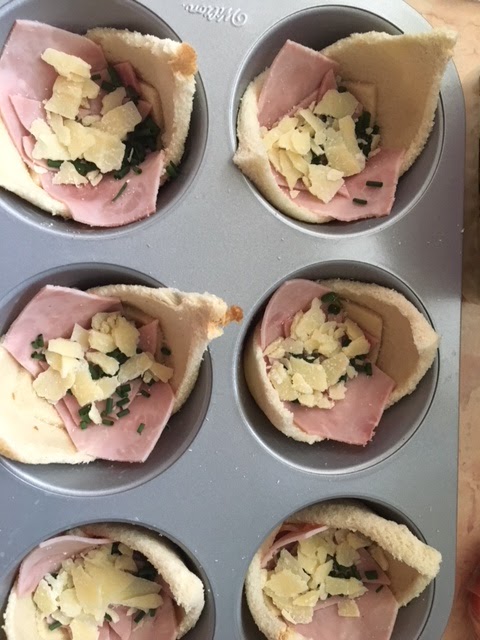
These breakfast cups are sure to impress and are easy to assemble once you get the hang of it! It's all about layering with the ingredients. My recipe is adapted from joyofbaking.com. Since I am always tight for time, I modified the ingredients, using cooked ham and parmesan petals, to save preparation time. They can be prepared ahead on the night before, covered and stored in the fridge so that I can catch a bit more sleep the next morning. Made these first time on Mothers' Day for Erik's mom. She loved them and went out to get her own jumbo muffin pan after that!
Utensils
6-cup jumbo muffin tray (preferable)
Pastry brush
Small microwave safe bowl
Rolling pin
Wooden cutting board
Bread knife and chef knife
Ingredients
9 pieces white sandwich bread
6 fresh large eggs
3 large rectangular pieces of cooked ham or any cured cold cuts of your choice
2 tablespoons of finely chopped red bell pepper
3 tablespoons of chopped fresh chives
1/3 cups of crumbled parmesan petals or any other shredded cheese of your choice
1 tablespoon unsalted/salted butter (melted)
Salt and black pepper to taste
Method
Pre-heat your oven to 350 degrees F.
Place butter in a small microwave safe bowl and heat until just melted. Using the pastry brush, brush butter onto the inside of muffin tray and cover the base and sides of the cups completely. Set aside for use until bread and ham are ready.
Trim off all the 4 sides of the bread.
Place each piece of bread on the cutting board and flatten it with a rolling pin. Then cut 6 pieces diagonally into 12 large triangles. Cut the remaining 3 pieces into smaller triangles making 12 small triangles in all.
Place 2 large triangles of bread into each cup with the base of the triangle towards the bottom. Arrange each piece against the sides of the cup with each piece facing opposite one another. Press the four touching tips of the triangles together. Then to cover the bottom of the cup completely, form a square piece of bread by placing the bases of two smaller pieces of triangles facing each other and pressing them to the bottom of the cup and along the sides, making sure that the whole cup is completely covered with bread.
Cut the cooked ham or any cured cold cuts of your choice longitudinally into half. Trim both ends into triangular shape. *Do make sure the trimmed pieces are long enough to drape the bottom and up the sides of the cup. Keep the end pieces; line each cup with one piece of the cut ham. Use up the end pieces to line the bottom of the cup after you have lined the cup with ham.
Divide and sprinkle chopped chives into each cup on top of the ham.
Divide, crumble and place the parmesan or shredded cheese of your choice into each cup.
Crack one egg into each cup after you have placed the chives and parmesan.
Divide and decorate each cup with finely chopped red bell pepper.
Lightly sprinkle the top with salt and black pepper.
Place the muffin tray into the pre-heated oven for 10 minutes at 350 degrees F.
Reduce the temperature of the oven to 300 degrees F for another 10 minutes. Remove from oven immediately! Place on a rack to cool slightly before serving.
*Please note: If you wish the eggs to be runny, remove from the oven once the egg whites becomes opaque while the yolks are still jiggly. You will have to keep watch!
Otherwise, 20 minutes will yield eggs that are firm but not overdone.
Every oven is different, so please adjust accordingly and watch the contents while baking.
Enjoy and impress!!!
Monday, February 26, 2018
Joanne's Easy Bake: Peachy Mango No Bake Cheesecake
Joanne's Easy Bake: Peachy Mango No Bake Cheesecake: This recipe is adapted from Kitchen 101. The original recipe called for a cookie base that was too thick and some left-over mango ...
Peachy Mango No Bake Cheesecake


This is a great dessert for great company. It has a mild tart flavor which makes it a refreshing and satisfying dessert at the end of a full meal. The recipe is adapted from Kitchen 101. The original recipe called for a cookie base that was too thick and some left-over mango puree that need not go to waste; so I decided to modify the recipe to suit my purpose. I made this to share with my BIG family during Christmas and New Year of 2017. The recipe will yield a 9" cake or alternatively, if you wish, the filling is sufficient to make two smaller cakes (an 8" and a 6") by varying the amount of chocolate baking crumbs.
Utensils needed:
1 large mixing bowl
Several small bowls to hold the various ingredients
Hand held mixer
Digital kitchen scale
Scraper
Measuring spoons
Measuring cups
A double boiler or pot
9" springform pan with removable bottom
One large plate
Ingredients for cake base:
150 g chocolate baking crumbs or graham crumbs *
4 tablespoons melted unsalted butter
Ingredients for cream cheesecake:
500 g cream cheese at room temperature
500 g mango puree or mango pulp (you may make your own mango puree by pureeing fresh mango)
100 g plain yogurt (do not use fat free)
3-1/2 tablespoon fresh lemon juice
165 g fine granulated sugar
28 g gelatin powder
1 cup water
250 g can peach slices (drained)
Ingredients for the mango gelatin topping:
350 g mango puree
14 g gelatin
1/4 cup water
1 teaspoon lemon juice
Method:
To prepare cake base:
Start by preparing the cake base. Line bottom of springform pan with plastic wrap and place a fitting cake board on top of the plastic wrap. Tighten pan.
Mix chocolate baking crumbs with melted butter. Stir to combine and place into the prepared pan. Spread crumbs evenly over the bottom of the pan and press firmly using the back of a spoon. Then place the pan with the crumb base to chill in the fridge until the cream cheese mixture is ready.
To prepare cream cheese cake:
Drain and cut sliced peaches into small cubes.
Juice the lemon and strain out all seeds.
Measure and prepare all the ingredients.
Combine gelatin powder with cup of water in a heat resistant bowl and let it soak for 10 minutes.
Using a hand held mixer, combine and beat cream cheese with sugar in a large mixing bowl until it is fluffy.
Add yogurt and lemon juice. Beat to combine.
Add mango puree to the mixture and beat to combine evenly.
Heat some water in a pot and bring to a simmer. Place bowl with soaked gelatin over the pot of simmering water and stir until gelatin dissolves and becomes a transparent liquid.
Remove bowl of gelatin from pot and pour melted gelatin into the cream cheese mixture. Stir to combine thoroughly.
Lastly, add the cubed drained peaches. Stir to mix evenly.
Take out chilled cake pan from fridge. Pour the cream cheese mixture into the chilled cake pan. Cover cake pan with a large plate and return cake pan to the fridge to chill for another 15 minutes.
To prepare mango gelatin topping:
While cake is being chilled, prepare the mango gelatin topping.
Turn on the stove and bring the previous pot of hot water to a simmer.
Combine 1/4 cup water with gelatin in the same bowl which you had previously used to melt the gelatin for the cake. Let it sit for 2 minutes.
Then place the bowl with soaked gelatin over the pot of simmering water and stir until gelatin dissolves and becomes a transparent liquid.
Remove bowl of gelatin from pot and turn off heat.
Place mango puree and lemon juice in a mixing bowl. Add melted gelatin, then stir to combine evenly.
Bring the cream cheesecake out from the fridge. Remove large plate. The top of the cake should be slightly firm to touch and not sticky.
Pour mango gelatin mixture over the top of the cake.
Tap the springform pan lightly on the counter top to evenly distribute the mango gelatin mixture.
Cover again with the large plate and return cheesecake to chill in the fridge overnight or for at least 4 hours before serving.
While your cake is being chilled, drain and slice thinly the rest of the peaches and decorate once the cake is completely chilled and firm to the touch.
Bring cake out to sit at room temperature for 20 minutes before slicing and serving.
Enjoy!

You may omit the mango gelatin topping and the cake will look like the above. This last photo was my first trial following the original recipe. I used chocolate baking crumbs instead of graham crumbs; but did not like the thick cookie base and had left over mango puree from the can.
* 180 g chocolate baking crumbs + 5 tablespoons melted unsalted butter will be sufficient to line both 8" and 6" springform pans.
Friday, October 20, 2017
Joanne's Easy Bake: Red Velvet Wedding Cupcakes
Joanne's Easy Bake: Red Velvet Wedding Cupcakes: I made the most daring commitment when I promised my son to make 120 cupcakes for his wedding reception! Having made the promis...
Red Velvet Wedding Cupcakes


I made the most daring commitment when I promised my son to make 120 cupcakes for his wedding reception! Having made the promise, it was through many tests and trials of recipes before deciding on this one that is most promising and a sure 'no fail' for the cupcakes and icing. The cupcake recipe is adapted from Laura Vitale's Red Velvet Cupcake (http://www.laurainthekitchen.com/recipes/red-velvet-cupcakes/). The icing decoration is buttercream icing that is formulated to be more like royal icing consistency in order to stay in shape until the cupcakes are consumed by my guests! It was a happy occasion for my family, friends and relatives and all the effort was well worth! The recipes are for 12 cupcakes and if you are as adventurous as me, making a promise for 120, you will have to do them batch by batch! In order not to over indulge, please make 12 and enjoy them over coffee and a good conversation!
Utensils Needed:-
12 cups muffin pan
Electric Mixer (Preferably a stand mixer)
Plastic Scraper/Spatula
Measuring spoons
Measuring cups
Flour wire mesh sieve
Measuring cup
Several Mixing bowls
12 paper muffin liners
1 ice cream scoop
Red Velvet Cupcakes
Ingredients
1-1/4 cups all-purpose flour
2 tablespoons cocoa powder
1/4 teaspoon baking powder
1/2 teaspoon baking soda
1/4 teaspoon fine sea salt
1/4 cup unsalted butter at room temperature
3/4 cups granulated sugar
3/4 cups buttermilk * (see below for recipe to make buttermilk)
1 large egg at room temperature
1 teaspoon pure vanilla extract
1/2 teaspoon red food coloring (I used Chef Master)
Method
1. Preheat oven to 325 degrees F. Line muffin pan with paper muffin liners and set aside for use when batter is ready.
2. Measure and sieve together the dry ingredients - flour, cocoa powder, baking powder, baking soda and sea salt into a mixing bowl and set aside.
3. Place sugar and butter into the mixing bowl of stand mixer and using the paddle attachment on high speed, beat until mixture becomes creamy (for about 20 minutes). Then add egg and vanilla and continue beating until well combined.
4. Let the mixer speed run on low and add half of the sifted dry ingredients into the creamy mixture. Then add half of the buttermilk, and mix until just combined. Then add the remaining half of the dry ingredients and remaining half buttermilk. Beat until just combined (do not over beat). As soon as mixture is ready, turn off mixer and remove the mixing bowl. Add food coloring and hand mix using the spatula until the batter is homogeneously colored.
5. Scoop batter into the lined muffin tray using an ice-cream scoop for even distribution of batter.
Place muffin tray in pre-heated oven and bake for 15 - 18 minutes until cake tester inserted comes out clean (do not over bake)!
6. Once cupcakes are cooked, remove tray from oven and let cupcakes rest for 5 minutes in the tray, then remove and place each cupcake to cool completely on a wire rack before frosting.
* Buttermilk Recipe
1 cup 1% cold filtered milk
1-1/2 teaspoon whipping cream (35% fat)
1 tablespoon distilled white vinegar
Method
Combine cold milk and whipping cream in a measuring cup. Discard 1/4 cup of the mixture (you may save it to drink or put into your coffee). Add the distilled vinegar; stir and let stand for 5 minutes. Mixture will curdle; and there you have it - your homemade buttermilk ready to use!
Joanne's Buttercream Icing
1/4 cup unsalted butter at room temperature
2 cups icing sugar **
2 tablespoon cooked corn starch (to make cooked corn starch, you may pre-bake the cornstarch at 250 degrees F for 20 minutes and let it cool completely before using). **
3 tablespoons skim milk or filtered cold water ** (Your choice - if you do not wish to refrigerate, then use water instead).
2 teaspoons pure vanilla extract
Food coloring of your choice
**Extra cooked corn starch or icing sugar to stiffen the consistency or extra milk or water to thin down the consistency if desire**
Method
1. Sieve corn starch into a clean bowl before using.
2. Sieve icing sugar into another clean bowl before using.
3. Place butter and icing sugar in the mixing bowl of a stand mixer and starting with low speed and slowly increasing the speed of the paddle attachment, beat the mixture until it is light and creamy.
4. Continue with the beater at low speed, add cooked corn starch and slowly add milk or water until you reach the desired consistency.
5. Lastly, add food coloring of your choice.
*If you are able to pipe the icing at ease, then you have reached the desired consistency. If you desire to thin the icing down, simply add more milk or water (but a little at a time) or to stiffen, simply add more cooked corn starch or icing sugar (also a little at a time). Stir to combine with a plastic spatula until icing is smooth and shiny. Pipe onto the cooled cupcakes using your imagination!
Enjoy!!!

Saturday, July 1, 2017
Joanne's Easy Bake: Easy Lemon Lavender Cake
Joanne's Easy Bake: One Bowl-Easy Lemon Lavender Cake: Easy Lemon Lavender Cake Purple and yellow are pretty contrasting colours. I recently came across a recipe in the Glo...
Subscribe to:
Posts (Atom)